Tuesday, June 19, 2012

Planning Your Home Remodel: The Design and Drawing Phase

This is the story of a Florida couple who just happens to own a mid-1970's home. I mean, lots of wood paneling, shag carpet, and funky colors (which aren't always a bad thing)!! This is their remodeling story of how they made their house current. Here is what they did:

1. Create a budget and a wish list. Knowing what your limits are and letting the designer know what they have to work with is very important. Having a wish list is also very import in the wonderful world of design. It lets us designers know what you want and we will try to give you everything and more, that is within your budget of course!! As a designer, it is my job to give you the most beautiful and functional design for your budget.

2. Define your story. In order for a designer to make your house functional for YOU, you and your family or whoever lives at your home, needs to know their story. How often do you really use your formal dinning room? Is there something "not working" with the flow of your kitchen? Do you really use your home office as an office, or is it more of a "catch all" room? Your house needs to be and define your lifestyle in order for a designer to make it functional to fit your needs.

3. Find inspiration. Look at magazines, internet (pinterest, houzz), newspapers, and even just looking around your neighborhood to see what your nieghbors are doing is important. That way if and when you want to sell your home, you are at a similar place of modernization and remodeling as the rest of the neighborhood family! Another good thing to do is, keep a journal. Add in ideas and picture of what you like to show your designer what you like and write down exactly what you liked.. was it the lighting or the sofa or even the art work?

4. Research the codes and regulations in your area. Can you even add-on if you wanted to, or is your home already built to the max according to city codes? Even though this is more of a step for the designer you hired, it is a good thing for the homeowner to check into before thinking about adding on.

5. Document/Sketch what already exists. I know, I know. Sketching is hard work and not everyone can do it. As a designer, I am not expecting a Picasso art piece nor straight lines, but just a simple layout of what you already have. Not to worry, as the designer, I will make many sketches and take measurements until you like what you see.

6. Look at the possiblities. All of them. You, as the client, should never settle on one design without looking at a few other options first. You never know what other really fantastic design is out there until you look. Even as a designer, I learn new things every day so, it is really hard to settle on one thing without looking around first!

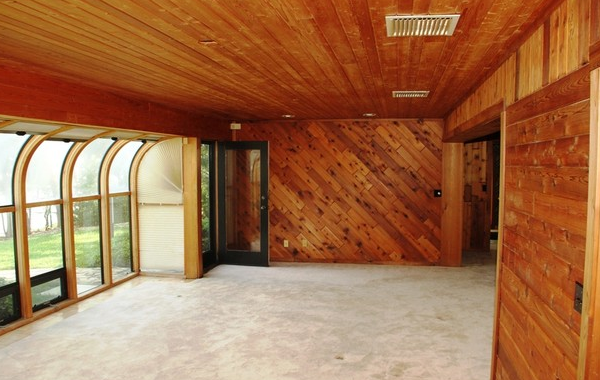
The first picture is before the remodel, the two pictures after is after the remodel. What a difference!!!


Monday, June 18, 2012

Modernizing Your Kitchen Without Remodeling

Getting tired of the same old-same old?! New some new pick-me ups for your kitchen, but can't afford or don't want to remodel?! I have some secret tips for you!!! Most of them are fairly simple diy projects that may require a little elbow grease, buying a few, cheap products, and a lazy weekend...

Tip #1:
If you have glass/see through cabinets, clean that clutter up!! And fill them with pretty china dishes or some cute new vases or something fun! Maybe even a few vintage pieces would be great as well.

Tip #2:
If you don't have any open/glass shelving, but would like to try it before committing to a remodel, try this: take off existing doors of cabinets. Replace with a nice, new coat of stain or paint and follow step one for decorating those newly "open" cabinets! (This looks especially great with all white cabinets, see pictures below)!

Did you know???
Open shelving in cabinets is great for one who entertains or has dinner parties. Open shelves makes a more comfortable and homey feel. And who knows, maybe your guests will help you prepare!!

Tip #3:
Adding some new art work!! New art for your kitchen is great and can be inexpensive too. Just look at your local hobby lobby or online for some wooden letters. Wooden letters have great potential for a kitchen! Not only can they be painted, but also coins, such as pennies can be glued on and given a poly-coat!! (See picture below)

Tip #4:
Organize!!! Organizing can make an old kitchen feel new again. Not to mention almost anything can be used as an organizing tool. If you have little ones, reuse baby food jars. Wash them out, get some chalk and chalk board paint for the metal lid, the finished product can hold individual spices!! Or give those storage containers on your counters a revamp!! Just get some sticky chalkboard labels, place them on and write (with chalk!) what's what. Easy, fun, and cheap!

Tip #5:
New lighting! New lighting can do wonders for a space, old or new and virtually anything can be made into a light fixture! From old washtubs to teacups to mason jars! What a great weekend project!! You can find literally TONS of tutorials online!!

Tip #6:
Adding wallpaper to your drawers!! Yes, wallpaper! Choose a pretty pattern that matches cabinets, counters, and appliances/fixtures. Your drawers will look beautiful inside and out!